
The vSeeBox V6 Plus is designed to provide a simple and user-friendly home entertainment experience. Powered by Android 14, equipped with 4GB RAM, 64GB storage, Wi-Fi 6, Bluetooth 5.0, and an Amlogic S905Y5 processor, the V6 Plus offers smooth performance and fast navigation.
If you've just received your device and are wondering how to set up vSeeBox V6 Plus, follow this step-by-step guide to get started in minutes.
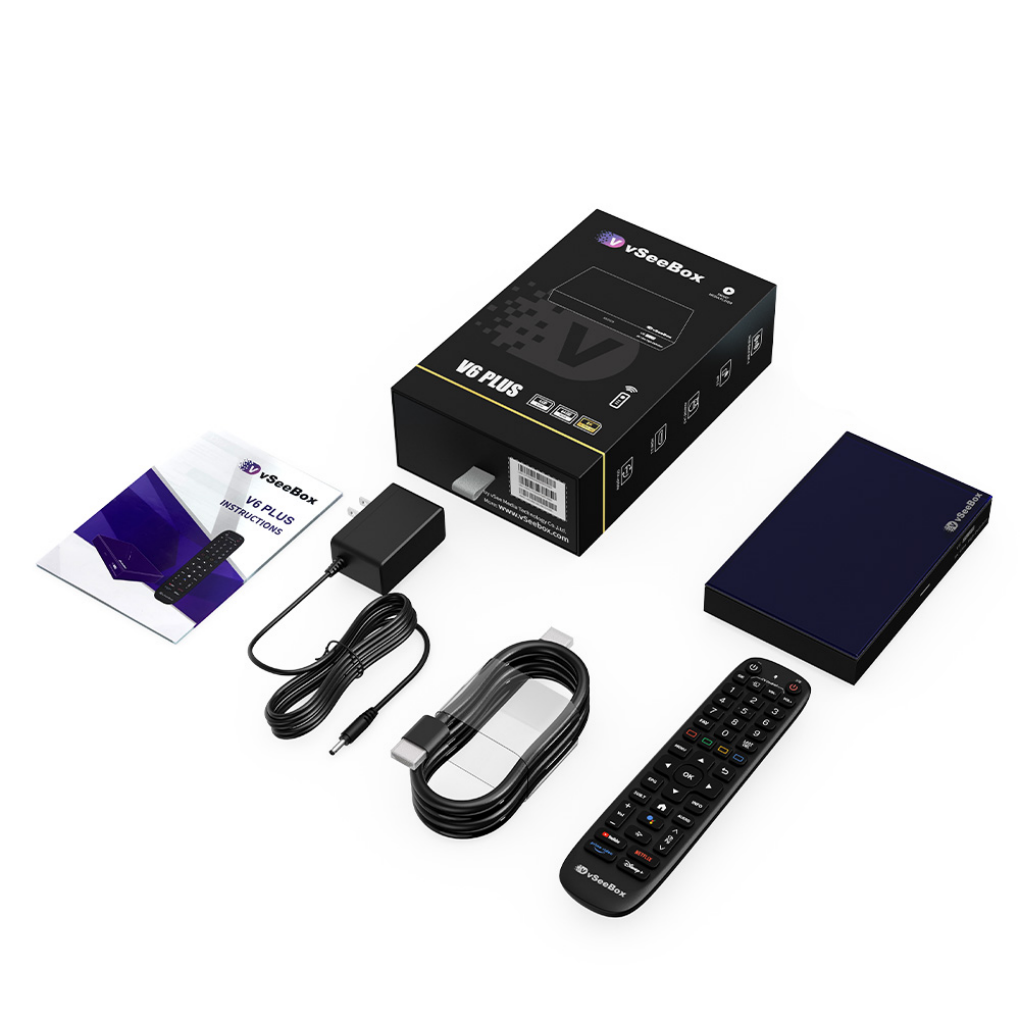
What Comes in the Box?
Before setup, verify that your package includes:
- vSeeBox V6 Plus
- Bluetooth Backlit Remote Control
- HDMI Cable
- Power Adapter
- User Manual
These accessories are included with the standard package.
Step 1: Connect the vSeeBox V6 Plus to Your TV
- Place the device near your TV.
- Connect the included HDMI cable from the V6 Plus to an available HDMI port on your television.
- Plug the power adapter into the device and then into a wall outlet.
- Turn on your TV.
- Select the corresponding HDMI input source.
Once connected, you should see the vSeeBox startup screen.
Step 2: Pair the Bluetooth Remote
The V6 Plus includes a backlit Bluetooth remote for easier navigation.
To pair:
- Insert AAA batteries into the remote.
- Follow the on-screen pairing instructions.
- Press and hold the designated pairing buttons until the remote connects.
After successful pairing, you can navigate the interface without pointing directly at the device.
Step 3: Connect to the Internet
A stable internet connection is essential for the best experience.
Option A: Wi-Fi Connection
- Open Settings
- Select Network & Internet
- Choose your Wi-Fi network
- Enter the password
- Click Connect
The V6 Plus supports dual-band Wi-Fi 6 (2.4GHz and 5GHz). For faster performance, use a 5GHz connection when available.
Option B: Ethernet Connection
For maximum stability:
- Connect an Ethernet cable from your router to the V6 Plus.
- The device should automatically detect the connection.
Many experienced users prefer Ethernet for the most consistent performance.
Step 4: Complete Basic Android Setup
After connecting to the internet:
- Select your preferred language.
- Adjust your region settings.
- Review privacy and system settings.
- Allow the device to finish any available system initialization.
Since the V6 Plus runs Android 14, the setup process is familiar and straightforward.
Step 5: Configure Display Settings
To get the best picture quality:
- Open Settings
- Select Display
- Choose the highest resolution supported by your TV
- Enable HDR if your television supports it
The V6 Plus supports HDMI 2.1 output and 8K video decoding capabilities.
Step 6: Connect Bluetooth Accessories
The device supports Bluetooth 5.0 connectivity.
You can connect:
- Bluetooth headphones
- Wireless speakers
- Game controllers
- Bluetooth keyboards
- Bluetooth mice
To pair:
- Open Settings
- Select Bluetooth
- Turn Bluetooth On
- Put your accessory into pairing mode
- Select the device from the list
Step 7: Enable HDMI-CEC (Optional)
HDMI-CEC allows your TV remote and vSeeBox to work together.
Benefits include:
- Powering on the TV and box simultaneously
- Simplified remote control usage
- Easier home entertainment management
Many users find HDMI-CEC convenient for daily use.
Step 8: Check for System Updates
To ensure optimal performance:
- Open Settings
- Navigate to System
- Select System Update
- Install available updates if provided
Keeping your device updated helps maintain compatibility and performance.
Common Setup Questions
How Long Does Setup Take?
Most users complete the setup process in less than 5–10 minutes. Community feedback frequently highlights the straightforward installation experience.
Should I Use Wi-Fi or Ethernet?
- Ethernet provides the most stable connection.
- Wi-Fi 6 offers excellent wireless performance for most households.
Do I Need Technical Knowledge?
No. The V6 Plus was designed with a beginner-friendly interface that guides users through the initial setup process.
Can I Use My TV Remote?
In many cases, yes. HDMI-CEC may allow compatible TVs to control basic functions using the television's remote.
Troubleshooting Tips
If the device does not start correctly:
- Verify the power adapter is securely connected.
- Confirm the HDMI cable is properly attached.
- Try a different HDMI port.
- Restart your router if network issues occur.
- Reboot the device and retry the setup process.
Most setup-related issues are caused by network configuration or connection problems rather than hardware faults.
Final Thoughts
Setting up the vSeeBox V6 Plus is quick and straightforward. With Android 14, Wi-Fi 6 connectivity, Bluetooth 5.0 support, 4GB RAM, and 64GB storage, the device is designed to provide a smooth and modern home entertainment experience.
By following the steps above, most users can complete installation and begin using their device within minutes.
Author Box
David Wilson
Home Entertainment Technology Specialist
David has spent over 10 years reviewing Android-based media devices, smart home technology, and consumer electronics. He focuses on helping users simplify setup, improve performance, and get the most from their home entertainment systems.


